Deploy Docker-ized React/Node.js on EC2 via Terraform


Terraform, Docker, and AWS are pivotal tools in modern software practices, enabling developers to streamline the process of deploying, managing, and scaling applications in the cloud. Here are notes from my journey in exploring the basics of Terraform, Docker, and AWS, and understanding how they work together.
Big picture
We will accomplish these steps:
- Build and package our web app into a Docker image.
- Push the Docker image to AWS Elastic Container Registry (ECR) which is a Docker container registry for storing container images.
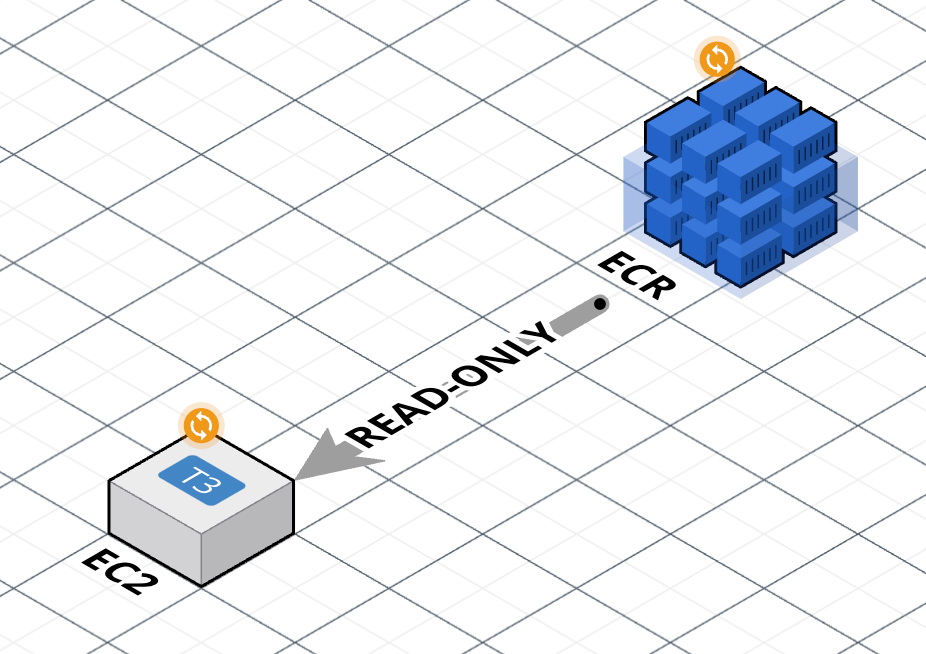
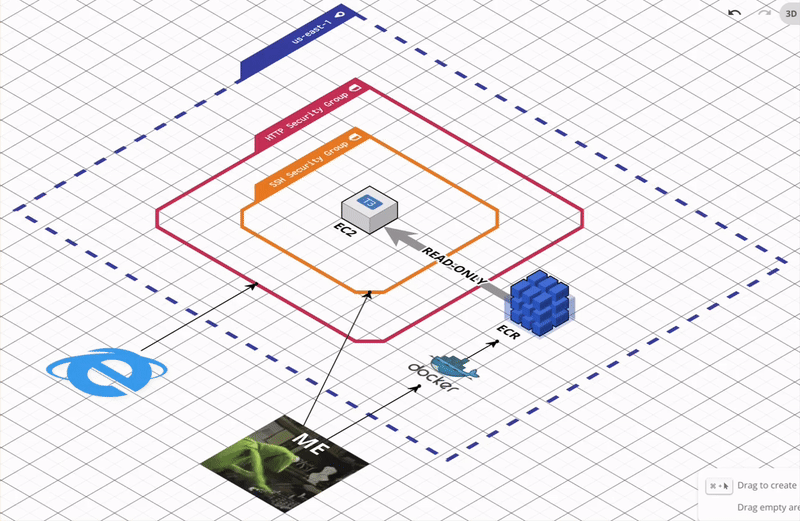
- Deploy an AWS Elastic Compute Cloud (EC2) instance that pulls the latest Docker image of our web app from ECR and starts our containerized web app.
Prerequisites
Before we start, ensure you have the following:
- Install Docker and Terraform on your local machine.
- Create an AWS Identity and Access Management (IAM) user with Admin access.
- Generate a secret access key for your IAM admin user to enable Terraform to interact with AWS.
- Generate an EC2 key pair to enable you to SSH into the EC2 instance.
All done? Here we go!
Step 1 - Build and package our web app into a Docker image

We will be using the React/Node.js app from this previous blog post.
Run the command docker init , answer several questions, to create a templated Dockerfile in the project root directory as a starting point.
The following Dockerfile was updated from the initial template, and it serves as a set of instructions to containerize our web app. It starts with an Alpine-based Node.js image and includes several steps to install dependencies, build the application, and set up the environment for production use:
# Dockerfile
# syntax=docker/dockerfile:1
ARG NODE_VERSION=20.12.2
FROM node:${NODE_VERSION}-alpine
ENV NODE_ENV production
WORKDIR /usr/src/app
# [A]
RUN \
npm ci --include=dev
# [B]
COPY . .
# [C]
RUN npm run build
# [D]
EXPOSE 3000
USER node
CMD npm run start
Annotations of the code comments above:
[A] Install dependencies using npm ci to ensure consistent builds and utilize cache mounts to improve build speed.
[B] Copy the dependencies into the WORKDIR to build and start our web app.
[C] Build the app!
[D] Expose port 3000 for incoming traffic, start the app as a non-root user for security reasons, and our app will now listen on port 3000 for connections.
To build this Docker image locally:
docker build . -t my-app
To run the image as a container:
docker run -it -p 3000:3000 my-app:latest
The -p 3000:3000 option publishes a port on the Docker host (the port accessible to the outside world) that maps to the container port (the port our Dockerfile exposes).
Step 2 - Push the Docker image to ECR

Now’s the time to introduce Terraform, an infrastructure-as-code (IaC) tool to define cloud resources and manage their lifecycle. It supports various cloud providers, including AWS, enabling developers to automate infrastructure provisioning, scaling, and teardown. Terraform's declarative syntax makes it easy to describe the desired infrastructure state, and its modular structure allows for reusable code and collaboration.
Before we delve into Terraform code, let’s first set our secret access key (see prerequisites) as environment variables to enable Terraform to interact with AWS when we run terraform commands. Store these keys securely, avoid sharing them publicly. I opted to save them in a gitignored .env file.
# .env

export AWS_ACCESS_KEY_ID=your-access-key-id
export AWS_SECRET_ACCESS_KEY=your-secret-access-key
Run this command in the project root directory before running any terraform command:
source .env

# confirm that the env variable has been exported
echo $AWS_SECRET_ACCESS_KEY
Now we’re ready to write some code. Terraform code lives in .tf config files. For the sake of illustration, I’ll be using just a single main.tf config file in the project root.
Let’s unpack the file in small chunks.
Provider configuration
# main.tf

# [A]
terraform {
  required_providers {
    aws = {
      source  = "hashicorp/aws"
      version = "~> 5.0"
    }
  }
}

# [B] AWS region variable
variable "aws_region" {
  description = "AWS region"
  type        = string
  default     = "us-east-1"
}

# [B] AWS Provider configuration
provider "aws" { # [B]
  region = var.aws_region
}

# [C] Data sources for AWS account and VPC
data "aws_caller_identity" "current" {}
data "aws_vpc" "default" {
  default = true
}

# [C] Local variables for common information
locals {
  account_id     = data.aws_caller_identity.current.account_id
  default_vpc_id = data.aws_vpc.default.id
  common_tags = {
    project = "blog-terraform-docker"
  }
}
Annotations of the code comments above:
[A] Providers allow Terraform to interact with cloud providers, SaaS providers, and other APIs. Therefore, Terraform configs must declare which providers they require so that Terraform can install and use them. In our case, we are declaring the AWS provider.
[B] Specify the AWS region in which we’d like to provision our resources.
[C] Data sources allow Terraform to use information defined outside of Terraform, and each cloud provider, including AWS, offers data sources that can be used in our configs. In this case, we will be using our AWS account ID as well the VPC ID that’s provisioned by default when we signed up for the AWS account. These are saved to local values to be used downstream in the rest of our code.
Provision an ECR repository to store our Docker images
# [A] Create an ECR repository
resource "aws_ecr_repository" "blog_terraform_docker" {
  name = "blog-terraform-docker"
  image_scanning_configuration {
    scan_on_push = true
  }
  tags = local.common_tags
}

# [A] ECR lifecycle policy to retain only one untagged image preceding the latest
resource "aws_ecr_lifecycle_policy" "blog_terraform_docker" {
  repository = aws_ecr_repository.blog_terraform_docker.name
  policy = <<EOF
    {
      "rules": [
        {
          "rulePriority": 1,
          "description": "Keep only one untagged image that precedes the latest image",
          "selection": {
            "tagStatus": "untagged",
            "countType": "imageCountMoreThan",
            "countNumber": 1
          },
          "action": {
            "type": "expire"
          }
        }
      ]
    }
    EOF
}

# [B] Build Docker image and push to ECR repository
resource "terraform_data" "docker_build" {
  depends_on = [aws_ecr_repository.blog_terraform_docker]

  # To make sure the local-exec runs every time
  triggers_replace = [timestamp()]

  provisioner "local-exec" {
    command = <<EOF
        # [C]
        aws ecr get-login-password --region ${var.aws_region} | docker login --username AWS --password-stdin ${local.account_id}.dkr.ecr.${var.aws_region}.amazonaws.com

        # [D]
        docker build --platform linux/amd64 -t "${aws_ecr_repository.blog_terraform_docker.repository_url}:latest" .

        # [E]
        docker push "${aws_ecr_repository.blog_terraform_docker.repository_url}:latest"
    EOF
  }
}
Annotations of the code comments above:
[A] This Terraform resource creates an ECR repository for storing Docker images. It includes a lifecycle policy to keep only two most recent images.
[B] The terraform_data resource is not AWS-specific (or specific to any cloud provider for that matter). It depends on the ECR resource, and runs the local-exec provisioner which invokes a script every time we run terraform apply.
The script runs 3 commands.
[C] First, authenticate Docker to our ECR repo.
[D] Second, build the docker image that assigns the image to our ECR repo URL and applies the latest tag. Sidenote: the docker build command here has an additional --platform linux/amd64 option, compared to the command to build the image on our local machine. I use a MacBook running on M2 chip which is based on ARM architecture, whereas EC2 free tier instances are typically based on x86 architecture. Explicitly passing the --platform linux/amd64 flag ensures Docker images are compatible with x86-based EC2 instances (interesting history behind the amd64 nomenclature).
[E] Lastly, push the image to the ECR repo. Sidenote: with ECR, we can easily share Docker images across our team. After authenticating with ECR, they can pull the image to their local machines with a docker pull command, referencing the repo URL and tag, and docker run the container locally.
Step 3 - Deploy EC2 that pulls from ECR and runs Docker container
To provision our EC2 instance, we need to do the following:
- Grant the EC2 read-only access to the ECR repo that contains our images.
- Control the inbound and outbound network traffic to EC2.
Grant EC2 read-only access to ECR repo
# [A] IAM Role for the EC2 instance to allow it to pull images from ECR.
resource "aws_iam_role" "blog_terraform_docker_ec2_role" {
  name = "blog-terraform-docker-ec2-role"

  assume_role_policy = jsonencode({
    Version = "2012-10-17",
    Statement = [
      {
        Action = "sts:AssumeRole",
        Effect = "Allow",
        Principal = {
          Service = "ec2.amazonaws.com",
        },
      },
    ],
  })

  tags = local.common_tags
}

# [B] Policy Attachment to allow EC2 instance to communicate with ECR.
resource "aws_iam_role_policy_attachment" "blog_terraform_docker_ec2_ecr_policy" {
  role = aws_iam_role.blog_terraform_docker_ec2_role.name
  policy_arn = "arn:aws:iam::aws:policy/AmazonEC2ContainerRegistryReadOnly"
}

# [C] Create an instance profile which will pass the role to EC2.
resource "aws_iam_instance_profile" "blog_terraform_docker_ec2_instance_profile" {
  name = "blog-terraform-docker-ec2-instance-profile"
  role = aws_iam_role.blog_terraform_docker_ec2_role.name
  tags = local.common_tags
}
Annotations of the code comments above:
[A] Create an IAM role, which is similar to an IAM user, in that it is an AWS identity assigned with permission policies that determine what the identity can and cannot do in AWS. But instead of being uniquely associated with one person like a user, a role is intended to be assumable by resources that need it, e.g., EC2.
[B] Create a policy attachment that grants read-only permissions to pull images from ECR, and assigns the permissions to the role.
[C] Create an instance profile to pass the role to an EC2 instance. This profile will subsequently be attached to the EC2 instance.
If the above makes no sense, here’s a lovely article with helpful diagrams to illustrate the relationship between roles, policies, profiles, and resources like EC2.
Control inbound and outbound network traffic to EC2 via Security Groups
Security groups act as virtual firewalls for our cloud resources, allowing us to control the traffic that enters and exits our EC2 instances.
Each security group defines a set of rules that specify allowed traffic based on protocol, port range, and source or destination IP address. Inbound rules determine which types of connections are allowed to reach our instance, such as SSH for remote login or HTTP/HTTPS for web traffic. Outbound rules determine what types of connections the instance can initiate, allowing us to restrict communication to specific services or networks.
# [A] Create a Security Group to allow SSH access to the instance.
module "dev_ssh_sg" {
  # https://registry.terraform.io/modules/terraform-aws-modules/security-group/aws/latest
  source = "terraform-aws-modules/security-group/aws"

  name        = "dev_ssh_sg"
  description = "Security group for SSH access"
  vpc_id      = local.default_vpc_id

  ingress_cidr_blocks = ["YOUR.IP.HE.RE/32"]
  ingress_rules       = ["ssh-tcp"]

  tags = local.common_tags
}

# [B] Create a Security Group to allow HTTP access to the instance.
module "public_http_sg" {
  # https://registry.terraform.io/modules/terraform-aws-modules/security-group/aws/latest
  source = "terraform-aws-modules/security-group/aws"

  name        = "public_http_sg"
  description = "Security group for HTTP traffic"
  vpc_id      = local.default_vpc_id

  ingress_cidr_blocks = ["0.0.0.0/0"]
  ingress_rules       = ["http-80-tcp"]
  egress_rules        = ["all-all"]

  tags = local.common_tags
}
Annotations of the code comments above:
[A] Create an SG that allows inbound SSH access to resources (i.e., EC2) within our default VPC via ingress_rules. Secure SSH access by limiting it to our IP address via ingress_cidr_blocks. Later, we will SSH into EC2 to confirm that the container is running, and examine error logs if it’s not.
[B] Create an SG that allows inbound HTTP traffic on port 80 to resources (i.e., EC2) within our default VPC via ingress_rules and allow all outbound traffic via egress_rules.
Deploy EC2
resource "aws_instance" "blog_terraform_docker_ec2_instance" {
  # [A]
  lifecycle {
    replace_triggered_by = [terraform_data.docker_build.id]
  }

  # [B]
  # Amazon Linux 2023 AMI 2023.4.20240416.0 x86_64 HVM kernel-6.1
  ami           = "ami-04e5276ebb8451442"
  instance_type = "t3.micro"

  # [C]
  key_name      = "blog-terraform-docker"

  # [D]
  iam_instance_profile = aws_iam_instance_profile.blog_terraform_docker_ec2_instance_profile.name

  # [E]
  vpc_security_group_ids = [
    module.ec2_sg.security_group_id,
    module.dev_ssh_sg.security_group_id
  ]

  # [F]
  user_data = <<-EOF
    # [G]
    #!/bin/bash
    sudo yum update -y
    sudo yum install -y docker
    sudo service docker start
    sudo usermod -a -G docker $(whoami)
    docker ps

    # [H]
    sudo dnf install -y amazon-ecr-credential-helper
    # Check if ~/.docker/config.json exists
    if [ ! -f ~/.docker/config.json ]; then
      # If not, create the file
      mkdir -p ~/.docker
      touch ~/.docker/config.json
    fi
    # Update the file with the content { "credsStore": "ecr-login" }
    echo '{ "credsStore": "ecr-login" }' > ~/.docker/config.json

    # [I] Pull the image from ECR and run a container with it.
    docker pull ${aws_ecr_repository.blog_terraform_docker.repository_url}:latest
    docker run -d -p 80:3000 ${aws_ecr_repository.blog_terraform_docker.repository_url}:latest
  EOF

  tags = local.common_tags
}
Annotations of the code comments above:
[A] For the sake of illustration, I’m destroying and re-launching a new EC2 instance every time we build and push a new Docker image to ECR.
[B] For the sake of my wallet, I chose an AMI and EC2 instance type that qualify for the AWS free tier.
[C] Assign the key pair (see prerequisites) to the EC2 instance, which we will use to authenticate our identity to SSH into EC2.
[D] Assign the IAM profile which passes to EC2 the IAM role granted with ECR read-only permission.
[E] Assign the SGs that define the rules around SSH and HTTP access to EC2.
[F] Pass a shell script to execute at the launch of the EC2 instance.
The script does the following:
[G] A series of commands to install Docker, start the Docker daemon, and grant the current user the permission to run Docker commands.
[H] Install a credential helper for the Docker daemon that makes it easier and more secure to authenticate Docker to the ECR repo.
[I] Pull the latest Docker image from the ECR repo, and start the image container. The -p 80:3000 option publishes a port on the Docker host (port 80 exposed to the outside world) that maps to the container port (port 3000 the Dockerfile exposes).
Finally
Run these commands, and let the magic happen.
terraform init
terraform plan
terraform apply
After Terraform apply is complete, SSH into your EC2 instance using our keypair (see prerequisites), and examine the logs in /var/log/cloud-init-output.log to ensure our user_data script ran as expected and/or to identify any issues or errors.
This will display the public DNS address of our EC2 when Terraform execution completes.
output "public_dns" {
  value = aws_instance.blog_terraform_docker_ec2_instance.public_dns
}
Open up http://your-public-dns in the browser and 🎉!


Resources
- Here’s my repo to see the whole thing come together.
- Diagrams were created with Cloudcraft.
 Liked what you've read?
 Follow me on LinkedIn!